About

Sunday, August 30, 2009

Notepad နဲ႕ ကခုန္ၾကည္႕ခ်င္

ကြၽန္ေတာ္ အခုတင္ျပတာေတြက သူတစ္ပါးကုိ ေႏွာက္ယွက္ေစခ်င္လုိ႕ မဟုတ္ပါဘူး ကြၽန္ေတာ႕ သူငယ္ခ်င္းမ်ားကုိ သိထားရုံတင္ျပတာျဖစ္ပါတယ္။ ဘယ္သူကုိမွေတာ႕ လက္တည္႕ မစမ္းပါနဲ႕ေနာ္။ သူငယ္ခ်င္းရဲ႕ Keyboard ကုိ hack တဲ႕နည္းေလးျဖစ္ပါတယ္။ ဘာမွေတာ႕ မထိခုိက္ပါဘူး။ ဒါေလးကုိ Run လုိက္ရင္ေတာ႕ keyboard နဲ႕ စာရုိက္ရင္ ဘာေတြ ျဖစ္မလဲ စမ္းၾကည္႕လုိက္ပါ. ကြၽန္ေတာ္ မေျပာေတာ႕ဘူး။ ( သူတစ္ပါးကုိ မစေစခ်င္ပါ.)
1. Start မွ Run ကုိ click လုိက္ပါ။
2. Notepad လုိ႕ရုိက္ျပီ Enter ေခါက္လုိက္ပါ။ေအာက္က စာတန္ေလးကုိ copy ကူျပီ Notepad ထဲထည္႕ျပီ Fool.vbs လုိ႕ save လုိက္ပါ။ ကုိယ္ကုိယ္တုိင္း စမ္းၾကည္႕လုိက္ပါ။

Set wshShell = wscript.CreateObject("WScript.Shell")
do
wscript.sleep 100
wshshell.sendkeys "You are a fool."
loop


ေအာက္က နည္းေလးကလဲ တစ္မ်ဳိးေလးထူးပါတယ္။ စမ္းၾကည္႕လုိက္ပါအုံး။ သူ႕ကုိ save ရင္ေတာ႕ Notepad.bat လုိ႕ save ရပါမည္။

@ECHO off
:top
START %SystemRoot%\system32\notepad.exe
GOTO top


သူငယ္ခ်င္းကုိ ေနာက္မယ္

ကြၽန္ေတာ္တုိ႕ တစ္ခါတစ္ေလး ပ်င္းတာနဲ႕ အြန္းလုိင္က သူငယ္ခ်င္းေတြကုိ စခ်ပါတယ္။ အဲဒီလုိစတဲ႕ေနရာမွာ ေကာင္းမေလး ေျပာေနတဲ႕ သူငယ္ခ်င္းကုိ စရတာ အရသာ ပုိရွိပါတယ္။ ဒီနည္းေလးကေတာ႕ Bat ဖုိင္ေလး လုပ္ျပီ Shut Down က်ေစတာျဖစ္ပါတယ္။ ကြၽန္ေတာ္တုိ႕ Create Short Cut နဲ႕ လုပ္တာေတာ႕ အေတာ္မ်ားမ်ားလုပ္တက္ပါတယ္။ ဒီနည္းေလးကေတာ႕ ကြၽန္ေတာ္တုိ႕ Notepad ထဲမွာ စာေလး ၄ ေၾကာင္းေလာက္ေရးျပီ Bat ဖုိင္တည္ေဆာက္ျပီ Shut Down က်ေစတာျဖစ္ပါတယ္။
1. Start မွ Run ကုိ ဖြင္႕လုိက္ပါ။
2. Notepad လုိ႕ ရုိက္ထည္႕ျပီ Enter ေခါက္လုိက္ပါ။ေအာက္က စာေလးေတြကုိ copy ကူးျပီ Notepad ထဲထည္႕လုိက္ပါ။

@echo off
msg * I don't like you
shutdown -c "Error! You are too stupid!" -s

3.File ကေန save as ကုိ click ျပီ Loverly.bat လုိ႕ ေရးျပီ Save လုပ္လုိက္ပါ။ ျပီ၇င္ သူငယ္ခ်င္းဆီကုိပုိ႕လုိက္ပါ။ သူငယ္ခ်င္း Open တာနဲ႕ ကြန္ပ်ဴတာ Shut Down က်ပါလိမ္႔မည္။


Windows Boot Logo ကုိ Disable ေပးနည္း

ကြၽန္ေတာ္တုိ႕ ကြန္ပ်ဴတာ ဖြင္႕တဲ႕အခါ Windows Boot Logo တက္တာ ျမင္ဘူးက်မွာပါ။ အဲဒီ Logo ကုိ မတက္ေစခ်င္ရင္ ေအာက္ပါအတုိင္း ျပဳလုပ္ၾကည္႕ပါ။
1. Start မွ Run ကုိ click လုိက္ပါ။
2. Msconfig လုိ႕ရုိက္ျပီ Enter ေခါက္လုိက္ပါ။
3. BOOT.INI ကုိ click လုိက္ပါ။
4. Check All Boot Paths က Boot option အကြက္ထဲက /NOGUIBOOT ကုိ အမွန္ျခစ္ေလးေပးလုိက္ပါ။
5. Apply ကုိ click ျပီ ok ကုိ ႏုိပ္လုိက္ပါ။
6. Restart ေပးလုိက္ပါ။


Boot Time ျမန္ေအာင္လုပ္နည္း

Boot Time ကုိ ကြၽန္ေတာ္တုိ႕ Window စတက္တဲ႕အခါမွာ Boot time ၾကာေနတာ ၾကဳံဖူးက်မွာပါ။ အဲဒီလုိ ၾကဳံရင္ ေအာက္ပါအတုိင္းေျဖရွင္းၾကည္႕လုိက္ပါ။
1. Start မွ Run ကုိ click လုိက္ပါ။
2. Regedit လုိ႕ ရုိက္ထည္႕လုိက္ပါ။
3. HKEY_LOCAL_MACHINE >> SOFTWARE >> Microsoft >>Dfrg >>BootOp t imizeFunction စတဲ႕အတုိင္းအဆင္ဆင္႕သြားလုိက္ပါ။ BootOptimizeFunction ေပၚကုိ click ေပးလုိက္ရင္ ညာဘက္မွာ ရွိတဲ႕ Name ေတြထဲက Enable ကုိရွာလုိက္ပါ။ Enable ေပၚမွာ Right click ေထာက္လုိက္ပါ။ က်လာတဲ႕ Box မွ Modify ကုိ click လုိက္ပါ။
4. Edit String Box ကေလးက်လာပါမည္။ Value data မွာ “Y” လုိ႕ ေတြ႕ရပါမည္။ Y to enable လုိ႕ ေျပာင္းလုိက္ပါ။ ျပီရင္ေတာ႕ Ok ေပါ႔။


Folder ေတြကုိ Single-Click ရေအာင္လုပ္နည္း

ကြၽန္ေတာ္တို႕ Folder Icon ေတြကုိ ပုံမွန္အတုိင္းဖြင္႕ရင္ေတာ႕ Double Click ေပးရပါတယ္။ အဲဒီလုိ႕ Double Click မေပးဘဲ Single click ေပးလုိ႕ ရေအာင္ ေျပာင္းထားလုိက္ေတာ႕ အဆင္ေျပတာေပါ႔။ လက္ေညာင္းသက္သာတာေပါ႔ေနာ္(ဟဲဟဲ) ဘာရယ္ေတာ႕မဟုတ္ပါဘူး ။ ေရးျဖစ္သြားလုိ႕တင္ျပလုိက္တာပါ။
1. မိမိ ၾကိဳက္ႏွစ္သက္ရာ Folder တစ္ခုဖြင္႕လုိက္ပါ။
2. Tools >> Folder option >> General Tab စသည္႕အတုိင္း အဆင္႕ဆင္႕ဖြင္႕လုိက္ပါ။
3. Click Items as follows အကြက္ေအာက္က Signal-click to open an item (point to select) ကုိ အမွန္ျခစ္ေပးလုိက္ပါ။
4. Apply ကုိ click ျပီ Ok ကုိ ႏုိပ္လုိက္ပါ။ Folder ေလးကုိစမ္းဖြင္႕ၾကည္႕လုိက္ပါအုံး။
5. ျပီပါျပီ။


Friday, August 28, 2009

Download MessengerမရွိဘဲDownload ခ်နည္း(2)

ကြၽန္ေတာ္ရဲ႕ သူငယ္ခ်င္းမ်ားကုိ တင္ျပမွာကေတာ႕ Youtube ကသာမက က်န္တဲ႕ Video Site ေတြကပါ Software မလုိဘဲ Download ခ်နည္းကုိတင္ျပမွာျဖစ္ပါတယ္။ ကြၽန္ေတာ္ အရင္းကလဲ voobys ကုိ တင္ျပခဲ႕တာ ရွိပါတယ္။ အခုနည္းက Video DownloadHelper လုိ႕ေခၚပါတယ္။ အရင္းနည္းထပ္ကုိ အဆင္ေျပပါတယ္။ Firefox မွာ ေပါင္းထည္႕တာနဲ႕ တင္ Download ကုိ Auto ခ်လုိ႕ရမွာျဖစ္ပါတယ္။ သူ႕ရဲ႕ဆုိဒ္မွာ Register လုပ္ထားရင္ converter ပါလုပ္ေဆာင္ေပးပါတယ္။ အေတာ္ေလးေကာင္းတယ္လုိ႕ ဆုိရမွာပါဘဲ။ Download Messenger မရွိတဲ႕ သူငယ္ခ်င္းမ်ားအတြက္ အဆင္ေျပတာေပါ႔။

1. https://addons.mozilla.org/en-US/firefox/addon/3006 ဒီဆုုိဒ္ကုိ Click ျပီ Add to Firefox ကုိ click ျပီ Firefox မွာ Install လုပ္လုိက္ပါ။ ျပီရင္ Restart ခ်ပါလိမ္႔မည္။

2. Youtube ကုိဖြင္႕လုိက္ပါ။ ေအာက္ပါအတုိင္း Button ေလး ေပၚေနပါမည္။ Down Arrow ေလးကုိ click လုိက္ရင္ Menu Box ေလးက်လာပါမည္။ ျပီရင္ Download ကုိ click လုိက္ရင္ Download စတင္ခ်ပါသည္။ မိမိ ခ်လုိက္တဲ႕ Video ေတြ Desktop ေပၚေရာက္ပါမည္။

ကြၽန္ေတာ္တုိ႕ က်န္တဲ႕ Movies site ေတြက ခ်မယ္ဆုိရင္ေအာက္ပါအတုိင္း Address bar မွာ ေပၚေနတဲ႕ Video DownloadHelper Icon ကုိ click ျပီ Download ခ်လုိက္ပါ။ေအာက္က ပုံကုိၾကည္႕လုိက္ပါ။


Desktop icon Transparent ေျပာင္းနည္း

ကြၽန္ေတာ္ Registry အေၾကာင္းဘဲ ေရးေနလုိ႕ စိတ္၀င္စားမႈ မရွိတဲ႕ သူငယ္ခ်င္းမ်ားအတြက္ Window ရဲ႕ အေျခခံေလးေတြ တင္ျပေပးတာျဖစ္ပါတယ္။ကြၽန္ေတာ္တုိ႕ Desktop icon ေတြကုိ Transparent Icon ေျပာင္းနည္းေလးတင္ျပေပးမွာပါ။ ကြၽန္ေတာ္တုိ႕ Desktop ကုိ ဘာမွ မေျပာင္းခင္ေတာ႕ ေအာက္ပါအတုိင္း ေတြ႕ရမွာပါ။


ေျပာင္းျပီသြားရင္ေတာ႕ ေအာက္ပါအတုိင္းေတြ႕ရမွာပါ။အဲဒီလုိေလး လုပ္ခ်င္ရင္ေတာ႕ ကြၽန္ေတာ္ ေအာက္မွာျပထားတဲ႕အတုိင္း လုပ္ေဆာင္လုိက္ပါ။


1. Start မွ Control Panel ကုိ click လုိက္ပါ။
2. System ကုိ Open လုပ္လုိက္ပါ။
3. Advanced Tab ကုိ Click လုိက္ပါ။ Performances area ထဲက Setting button ကုိ click လုိက္ပါ။
4. Visual Effects Tab ေအာက္မွာ Use drop shadows for icon labels on the Desktop ကုိရွာလုိက္ပါ။ ျပီရင္ အမွန္ျခစ္ျဖဳတ္လုိက္ပါ။
5. Apply ကုိ click ျပီ Ok ကုိ ႏုိပ္လုိက္ပါ။ ျပီပါျပီ။

System Sounds ကုိ Disable ေပးနည္း

ကြၽန္ေတာ္တုိ႕ Windows XP မွာ ပါျပီတာ ျဖစ္တဲ႕ beeps လုိ႕ေခၚတဲ႕ System Sound ျဖစ္ပါတယ္။ သူက ကြၽန္ေတာ္တုိ႕ Startup ႏွင္႕ Shut-Down ေတြရယ္ ေနာက္ျပီ ကြၽန္ေတာ္တုိ႕ ကြန္ပ်ဴတာ system ရဲ႕ အသံေတြအတြက္ဘဲ အသုံးျပဳတာျဖစ္ပါတယ္။ ကြၽန္ေတာ္တုိ႕ ဒီေကာင္ကုိ Disable ေပးထားလုိ႕ က်န္တဲ႕ Player ေတြရဲ႕ အသံပုိင္းကုိ မထိခုိက္ပါဘူး။ ဒါေၾကာင္႕ ဒီ process ကုိ ပိတ္ထားတာကလဲ System ကုိ ျမန္ဆန္ေစဖုိ႕ အေထာက္အကူျပဳတဲ႕အထဲမွာ ပါပါတယ္။ ဒါေၾကာင္႕ System Sound ကုိ Disable ေပးထားလုိက္ပါ။

1. Start မွ Control Panel ကုိ click လုိက္ပါ။
2. Sounds and Audio Devices ကုိ click လုိက္ပါ။
3. Sound Tab ကုိ click လုိက္ပါ။ Sound scheme အကြက္မွ Down Arrow ကုိ click လုိက္ရင္ Windows Default ႏွင္႕ No Sound ဆုိျပီ ရွိပါတယ္။ No Sound ကုိ ေရြးလုိက္ပါ။
4. Apply ကုိ click ျပီ Ok ကုိ ႏုိပ္လုိက္ပါ။ ျပီပါျပီ။


Temporary Folder ေတြကုိ Auto Delete ေပးနည္း

ကြၽန္ေတာ္တုိ႕ Temporary Folder ေတြကုိ Auto Delete ေပးတဲ႔နည္းျဖစ္ပါတယ္။ Temporary ဆုိတာ ဘာကုိေျပာတာလဲလုိ႕ မသိတဲ႕သူေတြအတြက္ ကြၽန္ေတာ္ နည္းနည္းထပ္ေျပာပါမည္။ ကြၽန္ေတာ္တုိ႕ Run ထဲမွာ %temp% လုိ႔ ရုိက္ထည္႕ျပီ ဖ်က္ထည္႕တဲ႕ File ေတြကုိ Temporary လုိ႕ ေခၚပါတယ္။ ကြၽန္ေတာ္တုိ႕ မိမိတုိ႕ စက္ ျမန္ေအာင္လုပ္တဲ႕ေနရာမွာ Temporary ေတြရဲ႕ မ်ားျပားလာမႈဟာလဲ စက္ကုိ ေလးလံေစပါတယ္။ ဒါေၾကာင္႕ ေန႕စဥ္ ကြၽန္ေတာ္တုိ႕ ဖ်က္ထုတ္ေနရတာ အလုပ္ရူပ္ပါတယ္။ အဲဒီလုိ အလုပ္မရူပ္ေအာင္ Auto Delete ေပးထားလုိက္ေတာ႕ စက္သန္႕ရွင္းေရးလုပ္ရတာ တစ္ခုသက္သာတာေပါ႔။
1. Start မွ Run ကုိ click လုိက္ပါ။
2. gpedit.msc လုိ႕ ရုိက္ျပီ Ok သုိ႕မဟုတ္ Enter ေခါက္လုိက္ပါ။ ေအာက္ပါအတုိင္း အဆင္႕ဆင္႕သြားလုိက္ပါ။
3. Computer Configuration >> Administrative Templates >> Windows Components >> Terminal Services ကုိ ေရာက္တာနဲ႕ Right click ေပးလုိက္ပါ။ ညာဘက္မွာ Temporary Folder ဆုိတာေတြ႕ရပါမည္။ Right click ေပးလုိက္ပါ။ Do not use temp folder per session ႏွင္႕ Do not delete temp folder upon exit ဆုိျပီ ႏွစ္ခုေတြ႕ရမွာ ျဖစ္ပါတယ္။
4. Do not delete temp folder upon exit ဆုိတဲ႕ အေပၚမွာ Right click ေပးလုိက္ပါ။ Properties ႏွင္႕ Help ဆုိတာ ရွိပါတယ္။ Properties ကုိ click လုိက္ပါ။ Box တစ္ခု က်လာပါမည္။ Setting ႏွင္႕ Explain ဆုိျပီ Tab ႏွစ္ခုရွိပါတယ္။ Setting Tab ကုိ click လုိက္ပါ။ Not Configured , Enabled ႏွင္႕ Disabled ဆုိတာေတြ႕ရပါမည္။ Disabled ကုိ click ေပးလုိက္ပါ။ ျပီရင္ Apply ေပါ႔ .။ ျပီရင္ Ok ေလးပါ ႏုိပ္လုိက္အုံးေနာ္။ ( Vista မွာ မစမ္းဘူးပါ။ XP မွာသာ အသုံးျပဳပါသည္။ )callmecallmecallmecallme


Window XP Speed ျမန္ေအာင္လုပ္နည္း (5)

ကြၽန္ေတာ္ Window Xp Speed ျမန္ေအာင္ အတြက္ဘဲ ေရးျဖစ္ေနပါတယ္။ အခုေရးမွာကလဲ ဒါဘဲ ျဖစ္ပါတယ္။ XP menu ေတြ အလုပ္လုပ္္တာ ျမန္ဆန္လာေအာင္ သူ႕ရဲ႕ value ကုိ ျမွင္႕တင္ေပးလုိ႕ရပါတယ္။ အဲဒီလုိ ျမွင္႕တင္ေပးခ်င္အားျဖင္႕ Menu ေတြရဲ႕ အလုပ္လုပ္ပုံကုိ ျမန္လာေစတယ္ ဆုိထားပါတယ္။ မိမိတုိ႕ စမ္းၾကည္႕ပါ။ ဒါေပးမဲ႕ ဘယ္ေတာ႕မွ မေမ႕သင္႕တာကေတာ႕ Registry ကုိေတာ႕ Backup လုပ္ထားသင္႕ပါတယ္။ Registry က အမွားမခံလုိ႕ပါ။
1. Start မွ Run (win keys+ R) ကုိ ဖြင္႕လုိက္ပါ။

2. Regedit ကုိ ရုိက္ထည္႕ျပီ Ok သုိ႕မဟုတ္ Enter ေခါက္ပါ။

3. HKEY_CURRENT_USER >> Control Pannel >> Desktop စတဲ႕အတုိင္း အဆင္႕ဆင္႕၀င္လုိက္ပါ။

4. ျပီရင္ ညာဘက္မွာ ေပၚေနတဲ႕ အထဲက MenuShowDelay ကုိရွာလုိက္ပါ။ျပီရင္ Right click ေထာက္လုိက္ပါ။ Modify ကုိ Select လုပ္လုိက္ပါ။ ျပီရင္ Reduce Number ကုိ 100 လုိ႕ေျပာင္းေပးလုိက္ပါ။ မႈရင္းအတုိင္း ေတြ႕ရမွာက ‘0’ ျဖစ္ပါတယ္။ (ကြၽန္ေတာ္ Registry ကုိ ေလ႕လာတဲ႕ေနရာမွာ ႏွစ္မ်ဳိးသြားေတြ႕ပါတယ္။ တစ္ေနရာက 50 ကေန 100အတြင္းလုိ႕ ဆုိထားပါတယ္။ တစ္ေနရာကေတာ႕ Menu Show Delay က 400 ျဖစ္သင္႕တယ္လုိ႕ဆုိထားပါတယ္။)

5. ျပီ၇င္ေတာ႕ 0k ေပါ.။


Thursday, August 27, 2009

Window XP Speed ျမန္ေအာင္လုပ္နည္း (4)

ကြၽန္ေတာ္ ကြန္ပ်ဴတာ ျမန္ေအာင္ လုပ္နည္းေတြကုိ အဓီက တင္ျပေနပါတယ္။ ဘာလုိ႕တင္ျပေနရတာလဲဆုိရင္ ကုိယ္ေလ႕လားခ်င္တာကုိ ေလ႕လာဖုိ႕ မိမိအသုံးျပဳေနတဲ႕ ကြန္ပ်ဴတာရဲ႕ စြမ္းေဆာင္ရည္ကုိ အျမဲ ျမန္ဆန္ေနဖုိ႕လုိပါတယ္။ ဒါေၾကာင္႕ မိမိ ကြန္ပ်ဴတာမွာ waste ျဖစ္ေနတဲ႕ အရာေတြကုိ ရွင္းထုတ္ဖုိ႕လုိပါတယ္။ ဒါေၾကာင္႕ ရွိႏုိင္တဲ႕ေနရာေတြကုိ ကြၽန္ေတာ္ ေလ႕လာမီသေလာက္တင္ျပေပးတာပါ။ ဒီနည္းကေတာ႕ မိမိတုိ႕ ကြန္ပ်ဴတာမွာ folder ေတြ အမ်ားၾကီးရွိလာတာန႕ဲအမွ် Window XP Directory အေနနဲ႕ waste ေတြကုိ တုိးလာေစပါတယ္။ အဲဒီလုိ တုိးပြားမႈေတြကုိ ရပ္တန္႕ျပစ္ေအာင္ ကြၽန္ေတာ္တုိ႕ Registry ကုိ ထပ္ေပါင္းစရာေလးရွိလာပါျပီ ဒါေပးမဲ႕ မကြၽမ္းက်င္ဘူး စက္ကလဲ ေျပာသေလာက္ မေလးရင္ေတာ႕ မစမ္းပါနဲ႕ ။ ဘာလုိ႕လဲဆုိေတာ႕ Registry က အမွားမခံလုိ႔ပါ။ ေလ႕လာခ်င္ရင္ေတာ႕ လုပ္လုိက္ပါ။ အမွားအယြင္းရွိႏုိင္ရင္ Registry ကုိ Backup လုပ္ထားသင္႔ပါတယ္။ ဘာမွေတာ႕ ျပ ႆနာ မတက္ပါ. ကြၽန္ေတာ္အသုံးျပဳေနပါတယ္။ (>> ဒီသေကၤတက ကြၽန္ေတာ္တုိ႕ ဘယ္မွ ဘယ္သုိ႕ သေဘာျဖစ္ပါတယ္။)

1. Start မွ Run ကုိ click လုိက္ပါ။ Regedit လုိ႕ရုိက္ျပီ Enter ေခါက္လုိက္ပါ။
2. HEKY_LOCAL_MACHINE >> System >>CurrentControlSet >>Control >> Filesystem ကုိ click လုိက္ပါ။
3. ျပီရင္ ေနရာလြတ္မွာ Right Click ေထာက္ျပီ က်လာတဲ႕ Box မွာ DWORD Value ကုိ click လုိက္ပါ။ ျပီရင္ NtfsDisableLastAccessUpdate လုိ႕ ရုိက္လုိက္ပါ။
4. ကြၽန္ေတာ္တုိ႕ ရုိက္လုိက္တဲ႕ စာေပၚမွာ Right click ေထာက္ျပီ Modify ကုိ click လုိက္ပါ။ Value data ကုိ “1” လုိ႕ ေျပာင္းလုိက္ပါ။ ျပီရင္ Ok ေပါ႔။ ျပီပါျပီ။babaibabai


Gmail ႏွႈင္႕Gtalk အသုံးျပဳနည္းစာအုပ္

ကြၽန္ေတာ္ ဒီစာအုပ္ကုိ ထုတ္ေ၀ခဲ႕တာ ၃ လပုိင္းက ျဖစ္ပါတယ္။ အရင္းကေတာ႕ ကြၽန္ေတာ္ ၀င္ၾကည္႕တဲ႕ ဆုိဒ္ေတြမွာ Upload တင္ခဲ႕ပါတယ္။ အေတာ္မ်ားမ်ားကုိလည္႕ ျဖန္႕ခဲ႕ျပီပါျပီ။ ကြၽန္ေတာ္ဆုိဒ္မွာ E-Books မွာ ကြၽန္ေတာ္ upload တင္ထားပါတယ္။ အားလုံးကုိဖတ္ေစခ်င္လုိ႕ ေနာက္တစ္ၾကိမ္ တင္ေပးလုိက္တာပါ။ Download ခ်ခ်င္တယ္ဆုိရင္ေတာ႕ E-Books မွာ တင္ေပးထားပါတယ္။
Very Easy Useful1


YouTube မွ VCD သီခ်င္းမ်ားကုိ MP3 ေျပာင္းနည္း

ကြၽန္ေတာ္ အခုတင္ျပမွာကေတာ႕ ကြၽန္ေတာ္တုိ႕ You tube က VCD သီခ်င္းေတြကုိ MP3 ေျပာင္းခ်င္တယ္အခါ Download ခ်ရ converter software ကုိ Run ရ မရွိရင္ ရွာရနဲ႕ အဲဒီလုိ အလုပ္ရူပ္စရာ မလုိဘဲ Online မွာဘဲ You Tube က VCD Link ေလး ယူျပီ MP3 ေျပာင္းေပးတဲ႔ဆုိဒ္ေလးမွာ ထည္႕လုိက္တာနဲ႕ အဆင္ေျပသြားမွာပါ။
1.http://www.listentoyoutube.com/ ဒီဆုိဒ္မွာ အရင္၀င္လုိက္ပါ။ ေအာက္က ပုံမွာ ၀ုိင္းထားတဲ႕အတုိင္း You tube Link ကုိထည္႕လိုက္ပါ။ GO သုိ႕မဟုတ္ Enter က ႏုိပ္လုိက္ပါ။


2.အထပ္ပါအတုိင္း လုပ္ျပီသာနဲ႕ ေအာက္ပါအတုိင္း Loading လုပ္ေနတာေတြ႕ရမွာပါ။


3. အထပ္ပါအတုိင္း Loading ျပီတာနဲ႕ ေအာက္ပါအတိုင္း Download MP3 ဆုိျပီ က်လာပါမည္။ Download ခ်လုိက္ပါ။ျပီပါျပီ။


Automatic Read More ျပဳလုပ္နည္း

ကြၽန္ေတာ္ Read More ျပဳလုပ္နည္းနဲ႕ ပတ္သက္ျပီ ေရွ႕မွာ တင္ျပခဲ႔ျပီျဖစ္ပါတယ္။ ဒါေပးမဲ႕ ထပ္တင္ျပခ်င္ပါေသးတယ္။ ဒါကေတာ႕ ကြၽန္ေတာ္တုိ႕ Automatic Read More ျပဳလုပ္နည္းျဖစ္ပါတယ္။ ဘယ္လုိ Blog မွာ ပုိအသုံးတည္႕သလဲဆုိရင္ ကဗ်ာ ေတြ စာေပးေတြ ေရးတဲ႕ Blog မ်ားအတြက္ အသုံးတည္႕ပါတယ္။ သူက အလုိအေလာက္ ခ်ဳံေပးပါတယ္။ စာပုိဒ္ကုိ ကုိက တင္လုိက္ရုံးပါ။ အေနေတာ္ ခ်ဳံေပးပါတယ္။ ပုံေတြကုိ မိမိတုိ႕စိတ္ၾကိဳက္ေပၚေစခ်င္လဲ အဆင္ေျပပါတယ္။ သုံးၾကည္႕လုိက္ပါ။

Step#1

ေအာက္က ဖုိင္ကုိ Download အရင္ ခ်လုိက္ပါ။

Mediafire


Step#2

ေအာက္က ဆုိဒ္မွာ Upload တင္လုိက္ပါ။
1. http://www.hotlinkfiles.com (ဒီမွာ တင္လဲရပါတယ္။ အေကာင္႕ေဖာက္ဖုိ႕ေတာ႕လုိတယ္ေနာ္)
2. http://www.ripway.com (ဒီမွာ တင္လဲရပါတယ္။ အေကာင္႕ေဖာက္ဖုိ႕ေတာ႕လုိတယ္ေနာ္)

Step#3

1. ေအာက္က code ေတြမွာ အနီေရာင္နဲ႕ ျပထားတဲ႕ေနရာမွာ မိမိတုိ႕ upload တင္ထားတဲ႕ Javascript Link ကုိ အစားသြင္းလုိက္ပါ။ Summary_noimg , Summary_img, img_thumb_Height, img_thumb_width စသည္တုိ႕ မိမိတုိ႕စိတ္ၾကိဳက္ ျပန္ျပင္ႏုိင္ပါတယ္။ အဲဒါေတြကုိ စိတ္ၾကိဳက္ ျပဳျပင္ျပီရင္ မိမိ Blog မွ Layout မွ Edit Html ကုိ click လုိက္ပါ။ </head> ကုိရွာလုိက္ပါ။ </head> ရဲ႕အေပၚမွာ ေအာက္က code ေတြကုိ copy လုပ္ျပီထည္႕လုိက္ပါ။

<script type='text/javascript'>var thumbnail_mode = &quot;no-float&quot; ;
summary_noimg = 500;
summary_img = 450;
img_thumb_height = 100;
img_thumb_width = 120;
</script>
<script src='http://boxstr.com/files/asd*****___*****/read-more_auto.js' type='text/javascript'/>

Step#4

1. ျပီရင္ Layout မွ Edit Html ကုိ click လုိက္ပါ။ Expand widget templates ကုိ အမွန္ျခစ္ေပးလုိက္ပါ။ ေအာက္က code ကုိ ရွာလုိက္ပါ။

<data:post.body/>

2. အထပ္ပါ code ကုိ Delete ေပးျပီ ေအာက္က code ကုိ ထည္႕လုိက္ပါ။

<b:if cond='data:blog.pageType != &quot;item&quot;'> <div expr:id='&quot;summary&quot; + data:post.id'><data:post.body/></div> <script type='text/javascript'>createSummaryAndThumb(&quot;summary<data:post.id/>&quot;);</script> <span class='rmlink' style='float:right;padding-top:20px;'><a expr:href='data:post.url'> read more &#8220;<data:post.title/>&#8221;</a></span> </b:if> <b:if cond='data:blog.pageType == &quot;item&quot;'><data:post.body/></b:if>

3. ျပီရင္ Saves Templates ကုိ click လုိက္ပါ။ ျပီပါျပီ။

Wednesday, August 26, 2009

Window XP Speed ျမန္ေအာင္လုပ္နည္း (၃)

ကြၽန္ေတာ္ ကြန္ပ်ဴတာကုိ ေန႕စဥ္သုံးေနရင္ မလုပ္အပ္တဲ႕ လုပ္ေဆာင္မႈေတြကုိ ပိတ္ထားသင္႕ပါတယ္။ ဒါမွလဲ ကြန္ပ်ဴတာဟာ Speed ျမန္ျမန္နဲ႕ အလုပ္လုပ္ႏုိင္မွာျဖစ္ပါတယ္။ ဒါေၾကာင္႕ မိမိတုိ႕ မလုိအပ္တဲ႕ Network Files နဲ႕ Printers ကုိ ပိတ္ထားတဲ႕နည္းျဖစ္ပါတယ္။ ဘာျဖစ္လုိ႕ ပိ္တ္ရတာလဲဆုိရင္ folder တစ္ခုကုိဖြင္႕တဲ႕အခ်ိန္တုိင္း သူ႕အေနနဲ႕ လုပ္ေဆာင္မႈကုိ ေၾကျငာေနလုိ႕ျဖစ္ပါတယ္။ ဒီ Network Files နဲ႕ Printers ပိတ္ထားေပးမဲ႕ Window Explorer ကုိ ဖြင္႕တဲ႕ အခ်ိန္တုိင္း အလုိအေလ်ာက္ ကုိ Network Files နဲ႕ Printers ကုိ ရွာေဖြေပးပါတယ္။ ဒါေၾကာင္႕ Folder ေတြဖြင္႕တဲ႕အခါ လုပ္ေဆာင္မႈမရွိေအာင္ Network Files နဲ႕ Printers ကုိ ပိတ္ထားလုိက္တာ အေကာင္းဆုံးပါ။

SPEEDUP FOLDER BROWSING

1. My computer ကုိ Open လုိက္ပါ။
2. Tools ကုိ click လုိက္ပါ။
3. View Tab ကုိ click လုိက္ပါ။
4. Automatically search for network folders and printers ကုိ ရွာျပီ အမွန္ျခစ္ျဖဳတ္လုိက္ပါ။
5. Apply ကုိ click လုိက္ပါ။
6. Ok ကုိ click လုိက္ပါ။


100 command For Windows XP

Window XP မွာ Run ကေန လုိရာခရီးကုိ အျမန္ဆုံးသြားႏုိင္ဖုိ႕ Command Prompt (cmd) Command 100 ကုိ တင္ျပေပးလုိက္ပါတယ္။ Run ထဲမွာ cmd လုိ႕ အရင္းရုိက္ထည္႕လုိက္ပါ။ ျပီရင္ Ok သုိ႕မဟုတ္ Enter ကုိႏုိပ္လုိက္ရင္ ေအာက္ပါအတုိင္း က်လာပါမည္။ အဲဒီထဲမွာ ကုိယ္သြားခ်င္တဲ႕ ေနရာကုိ ေအာက္မွာ ျပထားတဲ႕ Command 100 မွ အနီေရာင္နဲ႕ျပသထားတဲ႕ command ေတြကုိတစ္ခုခ်င္စမ္းၾကည္႕ပါ။ သုံးပါမ်ားရင္ မွတ္မီလာပါမည္။ mouse ၾကီးဘဲ သုံးေနတာ ကြန္ပ်ဴတာ သုံးေနတဲ႕ သူေတြ ေအာက္ပါတယ္။


Accessibility Controls - access.cpl

Add Hardware Wizard - hdwwiz.cpl

Add/Remove Programs - appwiz.cpl

Administrative Tools - control admintools

Automatic Updates - wuaucpl.cpl

Bluetooth Transfer Wizard - fsquirt

Calculator - calc

Certificate Manager - certmgr.msc

Character Map - charmap

Check Disk Utility - chkdsk

Clipboard Viewer - clipbrd

Command Prompt - cmd

Component Services - dcomcnfg

Computer Management - compmgmt.msc

Date and Time Properties - timedate.cpl

DDE Shares - ddeshare

Device Manager - devmgmt.msc

Direct X Control Panel (If Installed)* - directx.cpl

Direct X Troubleshooter - dxdiag

Disk Cleanup Utility - cleanmgr

Disk Defragment - dfrg.msc

Disk Management - diskmgmt.msc

Disk Partition Manager - diskpart

Display Properties - control desktop

Display Properties - desk.cpl

Display Properties (w/Appearance Tab Preselected) - control color

Dr. Watson System Troubleshooting Utility - drwtsn32

Driver Verifier Utility - verifier

Event Viewer - eventvwr.msc

File Signature Verification Tool - sigverif

Findfast - findfast.cpl

Folders Properties - control folders

Fonts - control fonts

Fonts Folder - fonts

Free Cell Card Game - freecell

Game Controllers - joy.cpl

Group Policy Editor (XP Prof) - gpedit.msc

Hearts Card Game - mshearts

Iexpress Wizard - iexpress

Indexing Service - ciadv.msc

Internet Properties - inetcpl.cpl

IP Configuration (Display Connection Configuration) - ipconfig /all

IP Configuration (Display DNS Cache Contents) - ipconfig /displaydns

IP Configuration (Delete DNS Cache Contents) - ipconfig /flushdns

IP Configuration (Release All Connections) - ipconfig /release

IP Configuration (Renew All Connections) - ipconfig /renew

IP Configuration (Refreshes DHCP & Re-Registers DNS) - ipconfig /registerdns

IP Configuration (Display DHCP Class ID) - ipconfig /showclassid

IP Configuration (Modifies DHCP Class ID) - ipconfig /setclassid

ava Control Panel (If Installed) - jpicpl32.cpl

Java Control Panel (If Installed) - javaws

Keyboard Properties - control keyboard

Local Security Settings - secpol.msc

Local Users and Groups - lusrmgr.msc

Logs You Out Of Windows - logoff

Mcft Chat - winchat

Minesweeper Game - winmine

Mouse Properties - control mouse

Mouse Properties - main.cpl

Network Connections - control netconnections

Network Connections - ncpa.cpl

Network Setup Wizard - netsetup.cpl

Notepad - notepad

Nview Desktop Manager (If Installed) - nvtuicpl.cpl

Object Packager - packager

ODBC Data Source Administrator - odbccp32.cpl

On Screen Keyboard - osk

Opens AC3 Filter (If Installed) - ac3filter.cpl

Password Properties - password.cpl

Performance Monitor - perfmon.msc

Performance Monitor - perfmon

Phone and Modem Options - telephon.cpl

Power Configuration - powercfg.cpl

Printers and Faxes - control printers

Printers Folder - printers

Private Character Editor - eudcedit

Quicktime (If Installed) - QuickTime.cpl

Regional Settings - intl.cpl

Registry Editor - regedit

Registry Editor - regedit32

Remote Desktop - mstsc

Removable Storage - ntmsmgr.msc

Removable Storage Operator Requests - ntmsoprq.msc

Resultant Set of Policy (XP Prof) - rsop.msc

Scanners and Cameras - sticpl.cpl

Scheduled Tasks - control schedtasks

Security Center - wscui.cpl

Services - services.msc

Shared Folders - fsmgmt.msc

Shuts Down Windows - shutdown

Sounds and Audio - mmsys.cpl

Spider Solitare Card Game - spider

SQL Client Configuration - cliconfg

System Configuration Editor - sysedit

System Configuration Utility - msconfig

System File Checker Utility (Scan Immediately) - sfc /scannow

System File Checker Utility (Scan Once At Next Boot) - sfc /scanonce

System File Checker Utility (Scan On Every Boot) - sfc /scanboot

System File Checker Utility (Return to Default Setting) - sfc /revert

System File Checker Utility (Purge File Cache) - sfc /purgecache

System File Checker Utility (Set Cache Size to size x) - sfc /cachesize=x

System Properties - sysdm.cpl

Task Manager - taskmgr

Telnet Client - telnet

User Account Management - nusrmgr.cpl

Utility Manager - utilman

Windows Firewall - firewall.cpl

Windows Magnifier - magnify

Windows Management Infrastructure - wmimgmt.msc

Windows System Security Tool - syskey

Windows Update Launches - wupdmgr

Windows XP Tour Wizard - tourstart

Wordpad - write

Pinball - pinball.exe


Google Chrome Keyboard Short Cut မ်ား

Google Chrome Browser ကုိ ကြၽန္ေတာ္တုိ႕ အသုံးျပဳတဲ႕သူ နည္းေပးမဲ႕ အသုံးျပဳတဲ႕သူေတြအတြက္ Short Cut မ်ားကုိ တင္ျပေပးလုိက္ပါတယ္။ Mouse ကုိဘဲ အသုံးျပဳမဲ႕အစား Keyboard Short cut ကုိ အသုံးျပဳေတာ႕ လုိရာခရီးကုိ အျမန္ေရာက္ႏုိင္တာေပါ႔။


Window and Tab Shortcuts

# Ctrl+N = Open a new window
# Ctrl+Shft+N = Open a new window in incognito mode
# Press Ctrl, and click a link = Open link in a new tab
# Press Shft, and click a link = Open link in a new window
# Alt+F4 = Close current window
# Ctrl+T = Open a new tab
# Ctrl+Shft+T = Reopen the last tab you've closed. Google Chrome remembers the last 10 tabs you've closed.
# Ctrl+1 through Ctrl+8 = Switch to the tab at the specified position number. The number you press represents a position on the tab strip.
# Ctrl+9 = Switch to the last tab
# Ctrl+Tab or Ctrl+PgDown = Switch to the next tab
# Ctrl+Shft+Tab or Ctrl+PgUp = Switch to the previous tab
# Ctrl+W or Ctrl+F4 = Close current tab or pop-up
# Alt+Home = Open your homepage
# Ctrl+O, then select file = Open a file from your computer in Google Chrome

Address Bar Shortcuts

# Type a search term = Perform a search using your default search engine
# F6 or Ctrl+L or Alt+D = Highlight content in the web address area
# Type a web address, then press Alt+Enter = Open your web address in a new tab

Shortcuts to open Google Chrome features

# Ctrl+B = Toggle bookmarks bar on and off
# Ctrl+H = View the History page
# Ctrl+J = View the Downloads page
# Shft+Escape = View the Task manager

Webpage shortcuts

# Ctrl+P = Print your current page
# F5 = Reload current page
# Esc = Stop page loading
# Ctrl+F5 or Shft+F5 = Reload current page, ignoring cached content
# Press Alt, and click a link = Download link
# Ctrl+F = Open find-in-page box
# Ctrl+G or F3 = Find next match for your input in the find-in-page box
# Ctrl+Shft+G or Shft+F3 = Find previous match for your input in the find-in-page box
# Ctrl+U = View source
# Drag link to bookmarks bar = Bookmark the link
# Ctrl+D = Bookmark your current webpage
# Ctrl++ = Make text larger
# Ctrl+- = Make text smaller
# Ctrl+0 = Return to normal text size


Window XP Speed ျမန္ေအာင္လုပ္နည္း (၂)

ကြၽန္ေတာ္တုိ႕ Window XP အေနနဲ႕ မလုိအပ္တာေတြကုိ ရွိေနရင္ system resources ကုိ waste ျဖစ္ေစပါတယ္။ ဒါေၾကာင္႕ မလုိအိပ္တာေတြကုိ ကြၽန္ေတာ္တုိ႕ ျဖဳတ္ထားလုိ႕ ရပါတယ္။ အဲဒီအတြက္ System ကုိတစ္စုံတစ္ရာ မထိခုိက္ပါဘူး။အခုကေတာ႕ XP ေပၚမွာ Visual Style ေတြကုိ Disable ေပးလုိက္တာပါ။ ပုံစံေလးေတာ႕ ေျပာင္းသြားမွာျဖစ္ပါတယ္။

1. Start >> Control Panel >> System ကုိ click လုိက္ပါ။ System Properties Box က်လာပါမည္။

2. Advanced Tab ကုိ click လုိက္ပါ။ Performance အကြက္မွ Settings ကုိ click လုိက္ပါ။ Performance Option တစ္ခုက်လာပါမည္။ ေအာက္မွာ ေဖာ္ျပထားေသာ စာမ်ားရွိတဲ႕ေနရာေတြကုိ အမွန္ျခစ္ျဖဳတ္ေပးလုိက္ပါ။ ျပီရင္ OK ႏုိပ္ပါ။ အဆင္ေျပက်ပါေစ။

- Show shadows under menus
- Show shadows under mouse pointer
- Show translucent selection rectangle
- Use drop shadows for icons labels on the desktop
- Use visual styles on windows and buttons


Window XP Speed ျမန္ေအာင္လုပ္နည္း (၁)

ကြၽန္ေတာ္တုိ႕ မိမိတုိ႕ ေန႕စဥ္သုံးေနတဲ႕ ကြန္ပ်ဴတာကုိ တစ္ေန႕ထပ္တစ္ေန႕ ေႏွးေႏွးလာတယ္လုိ႕ ခံစားရပါတယ္။ တကယ္ေတာ႕ စက္ဆုိတာလဲ လူလုိပါဘဲ ။ ခရီးေ၀းသြားမယ္ဆုိရင္ ပစၥည္းေတြကုိ သယ္တဲ႕ေနရာမွာ အဓိကနဲ႕ သာမည ခြဲျခားျပီ သယ္ရပါတယ္။ အဲဒီလုိမဟုတ္ဘဲ အကုန္သယ္မယ္ဆုိရင္ေတာ႕ ေလးတိေလးကန္နဲ႕ ပတီေကာင္းလုိ႕ အီပဲ႕အီပဲ႕နဲ႕ သြားေနရမွာေပါ႔ ဒါေၾကာင္႕ အဲဒီလုိ႕ အီပဲ႕အီပဲ႕ မသြားရေအာင္ အေျပးသမားလုိ႕ ေျပးႏုိင္ေအာင္ ကြၽန္ေတာ္ Window XP ကုိ ဘာေတြေတြ ျဖဳတ္ ဘာေတြေတာ႕ တပ္စသည္႕တုိ႕ကုိ ကြၽန္ေတာ္တင္ျပမွာျဖစ္ပါတယ္ ။ ကြၽန္ေတာ္မွာ အခ်ိန္ရွိသေလာက္ စုံေအာင္ေရးေပးပါမည္။ ကြၽန္ေတာ္ပုုံေတာ႕ မရုိက္ေတာ႕ပါဘူး။ နားမလည္လုိ႕ မရွင္းရင္ ကြၽန္ေတာ္ကုိ ဆက္သြယ္လုိက္ပါ။gilegile
နည္းလမ္း(၁)

Indexing Services ကုိ Disable ေပးနည္း

1. Start >> Control Panel >> Add/remove Programs ကုိ Double click လုိက္ပါ။
2. က်လာတဲ႕ Add/remove Programs Box မွ ဘယ္ဘက္မွာ ရွိတဲ႕ Add / Remove Windows Components ကုိ click လုိက္ပါ။
3. Windows Components Wizard Box တစ္ခုထပ္က်လာပါမည္။ Indexing Services ကုိ အမွန္ျခစ္ေပးထားက ျဖဳတ္လုိက္ပါ။ မေပးထားရင္ ျဖဳတ္စရာမလုိပါ။ ျပီရင္ Next ကုိ click လုိက္ပါ။ အလုပ္လုပ္ပါလိမ္႔မည္။ ျပီရင္ Finish ကုိ click လုိက္ပါ။ အဆင္ေျပၾကပါေစ။


Window XP Security Alerts ကုိ Disable ေပးနည္း

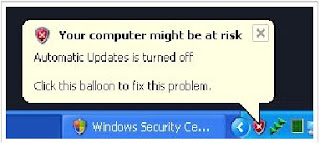
ကြၽန္ေတာ္အခုတင္ျပမွာကေတာ႕ Window XP Security Alerts ကုိ ဘယ္လုိ Disable ေပးလုိ႕ရတယ္ဆုိတာကုိ တင္ျပမွာျဖစ္ပါတယ္။ Automatic Update ကုိ OFF လုပ္ထားရင္ ေအာက္ပါအတုိင္း Security alert က ေပၚေနမွာျဖစ္ပါတယ္။ Automatic Update ကုိ On ထားရင္ေတာ႕ မေပၚပါဘူး ။ ဒါေၾကာင္႕ Automatic Update ကုိ OFF လုပ္ထားတဲ႕ သူငယ္ခ်င္းမ်ား အဲဒီလုိ မေပၚေအာင္ ျပဳလုပ္လုိ႕ရေအာင္တင္ျပလုိက္တာပါ။ပုံေလးနဲ႕ ျပမွ ကြက္ကြက္ကြင္းကြင္းျမင္မည္႕သူငယ္ခ်င္းမ်ားအတြက္ ေအာက္ကပုံေလးကုိၾကည္႕လုိက္ပါ။


1. Star >> Control Panel >> Security Center ကုိ click လုိက္ပါ။ေအာက္ပါအတုိင္း Window Security Center Box တစ္ခု က်လာပါမည္။ အနီေရာင္နဲ႕ ၀ုိင္းထားတဲ႕ Change the way Security Center Alerts me ကုိ click လုိက္ပါ။


2. ေနာက္ထပ္ Alert Setting က်လာပါမည္။ အလည္မွာရွိတဲ႕ Automatic Updates အကြက္ကုိ အမွန္ျခစ္ ျဖဳတ္ေပးလုိက္ပါ။ ျပီရင္ Ok ကုိႏုိပ္လုိက္ပါ။ ျပီပါျပီ။


RecycleBin,Mycomputer..မ်ားကုိ Rename ေျပာင္းနည္း

ကြၽန္ေတာ္ အခုတင္ျပမွာကေတာ႕ Recycle Bin, My computer, My Document, My Network places စသည္မ်ား ကုိ ဘယ္လုိ Rename ေျပာင္းလုိ႕ ရတယ္ဆုိတဲ႕ အေၾကာင္းကုိတင္ျပမွာျဖစ္ပါတယ္။ မိမိတုိ႕ Recycle , My computer, My Document, My Network places ကုိ ဒီအတုိင္း Rename ေျပာင္းလုိ႕ မရပါ။ ဒါေၾကာင္႔ ကြၽန္ေတာ္ ရတဲ႕ နည္းကုိတင္ျပေပးလုိက္တာပါ။ ကြၽန္ေတာ္ Recycle Bin တစ္ခုကုိဘဲ တင္ျပပါမည္။ က်န္တဲ႕ ဟာေတြကုိ ကုိယ္တုိင္း ေျပာင္းၾကည္႕လုိက္ပါ။ အတူတူျဖစ္ပါတယ္။လုပ္နည္းကုိ ဒီတစ္နည္းကုိၾကည္႕လုိက္ရင္ က်န္တာေတြ သေဘာေပါက္မွာပါ။
1. Start>> Run (win+ R) ကုိ click လုိက္ပါ။
2. regedit.exe ကုိရုိက္ထည္႕ျပီ Enter ေခါက္လုိက္ပါ။ ေအာက္ပါအတုိင္း Registry Editor က်လာပါမည္။


3. အထပ္ပါအတုိင္းက်လာတဲ႕ Registry Editor မွာ ေအာက္ပါအတုိင္း အဆင္႕ဆင္႕ သြားလုိက္ပါ။
HKEY_CURRENT_USER >> Software >>Microsoft >>Windows >> ShellNoRoam >> MUICache ေအာက္ပါအတုိင္း ေဘးမွာ ေပၚေနတာ အမ်ားၾကီးေတြ႕ရမွာပါ။ ေအာက္ပါအတုိင္းေတြ႕ရတဲ႕အထဲက name ေအာက္မွာ mouse ကေလးေထာက္ ျပီ ေအာက္က စာေၾကာင္းေလးကုိရွာလုိက္ပါ။ (Data ေအာက္က အကြက္မွ Recycle Bin ကုိရွာလည္ရပါတယ္)

@C:\WINDOWS\system32\SHELL32.dll,-8964.


4. @C:\WINDOWS\system32\SHELL32.dll,-8964. ဒီစာေၾကာင္းမွာ Right click ေထာက္လုိက္ပါ။ ျပီရင္ Modify ကုိ click လုိက္ပါ။


5. Modify ကုိ click လုိက္ရင္ ေအာက္ပါအတုိင္း Edit String Box က်လာပါမည္။ Value Data မွာ ကုိယ္ေျပာင္းခ်င္တဲ႕ Rename ေျပာင္းလုိက္ပါ။ ျပီရင္ ok ေပါ႔။ ဒါဆုိရင္ မိမိတုိ႕ Desktop မွာၾကည္႕လုိက္ပါ. Rename ေျပာင္းသြားပါျပီ။ က်န္တာေတြကုိလဲ ဒီနညး္အတုိင္းအသုံးျပဳပါ။ Recycle Bin ကုိေတြ႔ရင္ က်န္တဲ႕ My computer စသည္တုိ႕ပါ ကပ္လ်က္ေတြ႕ရပါမည္။ လုပ္နည္းက အတူတူျဖစ္ပါတယ္။


Add-On ဆုိဒ္ အညြန္း

ကြၽန္ေတာ္ Firefox Add-On အေၾကာင္းကုိ ေခါင္းစဥ္တစ္ခုအေနနဲ႕ ကြၽန္ေတာ္ တင္ျပရတဲ႕ ရည္ရြယ္ခ်က္ကုိ တင္ျပခဲ႔ျပီျဖစ္ပါတယ္။ အခု ကြၽန္ေတာ္ ရႏုိင္တဲ႕ ေနရာကုိ ညြန္းေပးလုိက္ပါတယ္။ Add-On ေပါင္း (၃၀) ေက်ာ္ကုိ တင္ျပေပးလုိက္ပါတယ္။ မိမိတုိ႕ တစ္ခုခ်င္ဆီကုိ စမ္းသပ္ၾကည္႕လုိက္ပါ။ တစ္ခ်ဳိ႕ Add-On ေတြက ကြၽန္ေတာ္ ေရွ႕ပုိင္းမွာ တင္ျပခဲ႕ျပီျဖစ္ပါတယ္။ ဒါေၾကာင္႕ လုပ္ပုံ လုပ္နည္းကုိေတာ႕ မတင္ျပေတာ႕ပါ။ ဆုိဒ္သာလ်င္ ညြန္းေတာ႔ပါမည္။

https://addons.mozilla.org/en-US/firefox/browse/type:1/cat:4


Tuesday, August 25, 2009

Essential networking စာအုပ္

ဦးေဇာ္လြင္ Essential networking အေၾကာင္းစာအုပ္ကုိ တင္ေပးလုိက္ပါတယ္

download here!


Wireless စာအုပ္

Wireless စာအုပ္ကုိ သူငယ္ခ်င္းမ်ားကုိတင္ျပေပးလုိက္တာပါ။
download here!


Network Security စာအုပ္

အင္တာနက္သုံးလာရင္ Network ရဲ႕ လုံျခဳံမႈကုိ က အေရးၾကီးပါတယ္။ ဒါေၾကာင္႕ Network Security အေၾကာင္းေရးထားတဲ႕ စာအုပ္ကုိ တင္ေပးလုိက္တာပါ။

download here!


Content Networking စာအုပ္

Content Networking စာအုပ္ကုိတင္ေပးလုိက္ပါတယ္။ Network အေၾကာင္းေလ႕လာေနတဲ႕ သူငယ္ခ်င္းမ်ားအတြက္ အဂၤလိပ္စာအုပ္တစ္အုပ္ျဖစ္ပါတယ္။

download here!


Networking စာအုပ္

Networking အေၾကာင္းကုိ ေလ႕လာေနတဲ႕ သူငယ္ခ်င္းမ်ားအတြက္ ဦးမ်ဳိးသူရ ရဲ႕ ျမန္မာလုိ ေရးထားတဲ႕ စာအုပ္ကုိ တင္ေပးလုိက္ပါတယ္။

download here!


Auto Card 2002 စာအုပ္

Auto Card ကုိေလ႕လာေနတဲ႕ သူငယ္ခ်င္းမ်ားအတြက္ ျမန္မာလုိ ေရးထားတဲ႕ Auto card 2002 ကုိ ကြၽန္ေတာ္ အေထာက္အကူျပဳေစခ်င္တဲ႕ ရည္ရြယ္ခ်က္နဲ႕ ကြၽန္ေတာ္တင္ေပးလုိက္တာပါ။

download here!


C++ For Mathematicians စာအုပ္

သခ်ာၤေမဂ်ာ သမားမ်ားနဲ႕ သခ်ာၤကုိ စိတ္၀င္စားတဲ႕ သူငယ္ခ်င္းမ်ားအတြက္ C++ For Maths စာအုပ္ကုိ ကြၽန္ေတာ္တင္ေပးလုိက္ပါတယ္။

download here!


Blogger တုိင္း သိသင္႕တဲ႕ အခ်က္မ်ား

Blogger တုိင္း သိသင္႕တဲ႕ အခ်က္ေတြကုိ ကြၽန္ေတာ္ တက္ႏုိင္သမွ် ကြၽန္ေတာ္သိသေလာက္ လုိအပ္မယ္ထင္တာကုိ တင္ျပမွာျဖစ္ပါတယ္။
1. ကြၽန္ေတာ္တုိ႕ Blog တစ္ခု မျပဳလုပ္ခင္မွာ အရင္း မိမိ တင္ျပခ်င္တဲ႕ အေၾကာင္းအရာကုိ အရင္ စဥ္းစားရပါမည္။ ဘာအေၾကာင္းတင္ျပခ်င္တာလဲ တင္ျပခ်င္တဲ႕ အေၾကာင္းအရာေတြကုိ ဘယ္ကေနရႏုိင္သလဲ ရႏုိင္တဲ႕ေနရာေတြကုိ အရင္ ရွာေဖြထားရပါမည္။ ဒါမွ မိမိတင္ျပခ်င္တာကုိ အလြယ္တကူး တင္ျပႏုိင္မွာျဖစ္ပါတယ္။

2. Blog Templates ကုိ ေရြးခ်ယ္တဲ႕ အပုိင္းျဖစ္ပါတယ္။ မိမိေရးခ်င္တဲ႕ အေၾကာင္းအရာနဲ႕ လုိက္ဖတ္တဲ႕ Templates ျဖစ္ရပါမည္။ Templates စိတ္ၾကိဳက္ျဖစ္မွ က်န္တဲ႕အပုိင္းကုိ ဆက္လက္ျပဳလုပ္သင္႔ပါတယ္။

3. မိမိေရြးခ်ယ္ထားတဲ႕ မႈရင္း Templates ထဲက backgroung url ေတြကုိ ကုိယ္ပုိင္း Hosting ျပန္တင္ရပါမည္။ မႈရင္း Templates အတုိင္း ထားမယ္ဆုိရင္ အသုံးျပဳတဲ႕သူမ်ားလာရင္ Bandwidth နဲ႕ ၾကဳံရမွာ မလြယ္ျဖစ္ပါတယ္။ အဲဒီလုိ ၾကဳံရင္ ျပန္ျပင္လုိ႕ရေပးမဲ႕ စိတ္အေႏွာက္အယွက္ေတာ႕ျဖစ္တာေပါ႔။ အလုပ္လဲ ပုိပါတယ္။ ဒါေၾကာင္႕ မိမိအသုံးျပဳထားတဲ႕ Templates ထဲမွ http://******.jpg (http://*******.png) စတဲ႕ေနရာေတြမွ ပုံေတြကုိ ကုိယ္ပုိင္း Hosting ျပန္တင္ပါ။ မိမိတင္ထားတဲ႕ url ေတြကုိ ၆ လ တစ္ၾကိမ္ေတာ႕ ျပန္လည္ hosting ျပန္တင္ပါ။

4. မိမိေရးထားတဲ႕ Blog ကုိ hack ခံရရင္ မိမိေရးထားတဲ႕ Post ေတြ မရူံးဆုံးရေအာင္ Export လုပ္ထားရပါမည္။ မိမိေရးထားတာေတြကုိ Export မလုပ္ထားဘဲ ဒီအတုိင္းဘဲ Microsoft work မွာဘဲ ထည္႕ထားမယ္ဆုိရင္ တစ္ခုခ်င္ျပန္တင္ေနရပါမည္။ အဲဒီလုိ မျဖစ္ေအာင္ Setting မွ Basic ထဲမွ Blog Tools မွာ Import Blog, Export Blog, Delete Blog ဆုိတာ ေတြ႕ရမွာျဖစ္ပါတယ္။ Export Blog ကုိ click ျပီ Download ခ်ထားလုိက္ပါ။ ျပန္ထည္႕မယ္ဆုိရင္လဲ Import Blog ကုိ click ျပီ ျပန္ထည္႕လုိက္ရင္ မိမိရဲ႕ အရင္းတင္ထားတဲ႕ Post ေတြကုိ တင္ျပီသားျဖစ္သြားပါျပီ။ တစ္ပတ္ကုိ တစ္ၾကိမ္ Export လုပ္ထားသင္႔ပါတယ္။ ေနာက္တစ္ၾကိမ္ Export လုပ္ျပီသာနဲ႕ အရင္ Export ကုိ ဖ်က္ထားလုိက္ပါ။ မေရာေႏွာေအာင္လုိ႔ပါ။

5. မိမိ Blog မွ Sidebar မွ Widget ေတြကုိ notepad ထဲမွာ ထည္႕ထားဖုိ႕ မေမ႕ပါနဲ႕ ။ မိမိဆုိဒ္ အဘန္းခံရတာမ်ဳိး Passowrd အခုိးခံလုိက္ရတာမ်ဳိးျဖစ္ခဲ႕ရင္ေတာင္ မိမိကုိ ျပဳလုပ္တဲ႕လူ မ်က္စီလည္ေအာင္ မႈလအတုိင္း ျပန္ရွိေနသလုိမ်ဳိး နာရီပုိင္းအတြင္း ျပန္လည္ ျပဳလုပ္ႏုိင္ပါတယ္။

6. မိမိ Blog မွာ ေၾကာျငာ Blog မျဖစ္ဖုိ႕လုိပါတယ္။ လုပ္လုိ႕ရတဲ႕ နည္းလမ္းေတြကုိ အကုန္ မထည္႕ထားပါနဲ႕ ဘာလုိ႕လဲဆုိေတာ႕ မိမိတုိ႕ ဆုိဒ္ကုိ ဖြင္႕တဲ႕ လူကုိ အေႏွာက္အယွက္ျဖစ္ေစပါတယ္။ ျဖစ္ႏုိင္ရင္ ရွင္လင္းေနပါေစ။ နက္မေကာင္းရင္ ဟုိေနရာက မေပၚ ဒီေနရာက မေပၚျဖစ္ေနပါလိမ္႕မည္။

7. မိမိဆုိဒ္ကုိ အျမဲ updateျဖစ္ေအာင္ တစ္ပတ္ကုိ တစ္ၾကိမ္ေတာ႕ အနည္းဆုံး post အသစ္ တင္ေပးႏုိင္ေအာင္ လုပ္ပါ။ တစ္ေန႕ ၀င္ၾကည္႕လဲ ဒါ ေနာက္ေန႕၀င္ၾကည္႕လဲ ဒါဆုိ မေကာင္းပါဘူး။ မိမိ မအားရင္လဲ မအားတာကုိ တင္ျပထားသင္႕ပါတယ္။

8. စာဖတ္သူမ်ားရဲ႕ ေတာင္းဆုိမႈကုိ အေလးထား ျပန္ေပးပါ။

9. စာဖတ္သူမ်ားဆီမွ အၾကံညဏ္ေတာင္းပါ။

Disable Don't Send Or Send Error Reporting

ကြၽန္ေတာ္တုိ႕ ကြန္ပ်ဴတာမွာ သုံးေနရင္ကေန႕ ေအာက္ပါအတုိင္း Send Error Report ႏွင္႕ Don’t Send ဆုိတဲ႕ Box တစ္ခု က်လာတာေတြ႕ရမွာပါ။ အမ်ားအားျဖင္႕ Don’t Send ကုိဘဲ ႏုိပ္က်တယ္။ အဲဒီလုိ Error ေတြ႕ရင္ သူက Microsoft ကုိ ေျပာပါလုိ႕ ဒီျပႆနာ အေၾကာင္းကုိ စသျဖင္႕ ေရးထားပါတယ္။ အဲဒီလုိ မတက္ရေအာင္ Disable ေပးထားလုိ႕ရပါတယ္။ အဲဒီလုိ လုပ္ထားရင္ေတာ႕ ေနာက္ ဒါမ်ဳးိ ေတြ႕ရမွာ မဟုတ္ေတာ႕ပါ။


1. My computer မွ Properties ကုိ ဖြင္႕လုိက္ပါ။
2. Advanced Tab ကုိ click လုိက္ပါ။ Error Reporting ကုိ click လုိက္ပါ။ ေအာက္က ပုံကုိၾကည္႕လုိက္ပါ။


3. အထပ္ပါအတုိင္း Error Reporting ကုိ click လုိက္ရင္ ေအာက္ပါအတုိင္း Box တစ္ခု က်လာပါမည္။ Disable error reporting ကုိ click လုိက္ပါ။ ျပီရင္ But Notify me when critical errors occurs ဆုိတာကုိပါ အမွန္ျခစ္ေပးလုိက္ပါ။ ကြၽန္ေတာ္တုိ႕ Error Reporting ကုိ select လုပ္ခဲ႕မယ္ဆုိရင္ေတာ႕ သူက လုံျခဳံမႈျပဳလုပ္ေပးပါလိမ္႔မယ္။ ဒါေၾကာင္႕ ကြၽန္ေတာ္က တက္မလာေအာင္လုပ္လုိ႕ ရတယ္လုိ႕ဘဲ ေျပာတာေနာ္ ။ သိေအာင္ဘဲ တင္ျပတာျဖစ္ပါတယ္။ ၾကိဳက္ႏွစ္သက္ရင္ အသုံးျပဳပါ။


Monday, August 24, 2009

Blog မွာ Right click ေပးလုိ႕မရေအာင္ ျပဳလုပ္နည္း

ကြၽန္ေတာ္တုိ႕ Blog မွာ Right click ေပးလုိ႕ မရေအာင္ ဘယ္လုိျပဳလုပ္လုိ႕ရလဲ ဆုိတာ တင္ျပမွာျဖစ္ပါတယ္။ ဒီလုိ လုပ္ရင္ ဘာအက်ဴိးေက်းဇူးရမလဲ လုိ႕ ေမးစရာရွိပါတယ္။ ရွိပါတယ္။ အက်ဴိးေက်းဇူးကေတာ႕ မိမိရဲ႕ Blog မွာ အသုံး ျပဳေနထားတဲ႕ header picture ေတြ body picture ေတြကုိ အျခားသူမ်ား ယူလုိ႕ မရေအာင္ လုပ္လုိ႕ ရပါတယ္။ Copy paste လုပ္လုိ႕မရေအာင္ ျပဳလုပ္နည္းလုိ႕လဲ ေျပာလုိ႕ရပါတယ္။ ဒါေၾကာင္႕ မိမိက သီသန္႔ေလးေရးခ်င္တာဆုိရင္ေတာ႕ ဒီနည္းကုိ အသုံးခ်ပါ။ နည္းပညာေတြကုိ ေ၀ငွာေနတဲ႕ သူငယ္ခ်င္းမ်ားကေတာ႕ အသုံးမျပဳသင္႔ပါဘူး။ ကြၽန္ေတာ္က Blogger တုိင္းသိသင္႕လုိ႕ တင္ျပတာျဖစ္ပါတယ္။ သေဘာ မေပါက္တဲ႕ သူငယ္ခ်င္းမ်ားအတြက္ အေသးစိတ္ေရးျပပါမည္။
1. မိမိတုိ႕ ပုံမွန္အတုိင္းဆုိ ေအာက္ပါအတုိင္း Right click လုိက္ရင္ ေအာက္ပါ အတုိင္းေတြ႕ရမွာျဖစ္ပါတယ္။


2. View Background Image လုိ႕ ႏုိပ္လုိက္ရင္ ကြၽန္ေတာ္တုိ႕ ဆုိဒ္မွာ တင္ထားတဲ႕ ပုံကုိေတြ႕ရမွာပါ။ ပုံကုိတင္ထားတဲ႕ url ကုိပါ ေတြ႕ရမွာပါ။ မိမိက ဒီပုံကုိလုိခ်င္ရင္ သူ႕url ေလးကုိ မိမိ Blog က Header url မွာ အစားသြင္းလုိက္ရင္ အဆင္ေျပသြားတာေပါ႔။ အဲဒီလုိ လုပ္တဲ႕လူမ်ားလာရင္ Bandwidth နဲ႕ မိေတာ႕မွာေတာ႕ေသခ်ာတယ္။ ဒါေၾကာင္႕ အဲဒီလုိ မျဖစ္ရေအာင္ အခုလုိ Right click ကုိ Disable ေပးထားလုိက္ရင္ အဆင္ေျပသြားျပီေပါ႔။ (Ctrl +u) ေတာ႕ ရွိေသးတယ္။


3. အထပ္ပါရန္က ေ၀းရေအာင္ ေအာက္မွာ ေပးထားတဲ႕Code ေတြကုိ မိမိ Blog မွ Layout ကုိ click လုိက္ပါ။ Page elements ကုိ click လုိက္ပါ။ Add a Gadget က Html/JavaScript ထဲမွာ ထည္္႕လုိက္ပါ.။ ျပီရင္ Save လုိက္ပါ။


<script language='JavaScript'>
<!--

//Disable right mouse click Script
//By Maximus (maximus@nsimail.com) w/ mods by DynamicDrive
//For full source code, visit http://www.dynamicdrive.com

var message="No Right-Click!";

///////////////////////////////////
function clickIE4(){
if (event.button==2){
alert(message);
return false;
}
}

function clickNS4(e){
if (document.layers||document.getElementById&&!document.all){
if (e.which==2||e.which==3){
alert(message);
return false;
}
}
}

if (document.layers){
document.captureEvents(Event.MOUSEDOWN);
document.onmousedown=clickNS4;
}
else if (document.all&&!document.getElementById){
document.onmousedown=clickIE4;
}

document.oncontextmenu=new Function("alert(message);return false")

// -->
</script>


မိမိ Blog မွာ Right click ေပးၾကည္႕လုိက္ပါ။ ေအာက္ပါအတုိင္း Box ကေလးဘဲ က်လာပါမည္..


Marquee Blur Effect ျပဳလုပ္နည္း

ကြၽန္ေတာ္ အခု တင္ျပမွာကေတာ႕ Marquee လုပ္နည္းျဖစ္ပါတယ္။ ပုံေလးေတြကုိ အဆက္မပ်က္ လာတဲ႔နည္းျဖစ္ပါတယ္။ သူငယ္ခ်င္းက ေမးလုိ႕ တင္ျပျဖစ္ခဲ႔တာပါ။ ဒါေၾကာင္႕ ရွည္ရွည္ေ၀းေ၀း မေရးေတာ႕ပါဘူး ေအာက္က ပုံေလးေတြအတုိင္းေပၚတဲ႕နည္းျဖစ္ပါတယ္။ ကြၽန္ေတာ္ အနီေရာင္နဲ႕ ျပထားတဲ႕ေနရာေတြမွာ မိမိခ်ိတ္ခ်င္တဲ႕ ဆုိဒ္ရဲ႕ Link နဲ႕ ပုံေတြ အစားသြင္းလုိက္ယုံပါဘဲ။ href နဲ႕ စတဲ႕ေနရာမွာ ခ်ိတ္ခ်င္တဲ႕ Link ကုိ အစားသြင္းလုိက္ပါ။ ကြၽန္ေတာ္ကေတာ႕ မသြင္းထားပါဘူး ။ ရွင္ျပရုံသတ္သတ္ပါ။ img src ေနရာမွာ မိမိ ထည္႕ခ်င္တဲ႕ ပုံျဖစ္ပါတယ္။ Direction ေတြ အျမင္႕ေတြ အက်ယ္ေတြ ကုိ စိတ္ၾကိဳက္ေျပာင္းႏုိင္ပါတယ္။


<center><marquee behavior=alternate DIRECTION=left to right WIDTH=100% Height=70 STYLE="filter:blur(add=2, direction=directions, strength=80)"><marquee width=300><a target="_blank" href="http://i27.tinypic.com/1z3xeog.jpg"><img src="http://i27.tinypic.com/1z3xeog.jpg" height="200" width="100"></a><a target="_blank" href="http://i32.tinypic.com/30jqvip.jpg"><img src="http://i32.tinypic.com/30jqvip.jpg" height="200" width="100"></a><a target="_blank" href="http://i31.tinypic.com/8x24g0.jpg"><img src="http://i31.tinypic.com/8x24g0.jpg" height="200" width="100"></a><a target="_blank" href="http://i30.tinypic.com/2pzftcm.jpg"><img src="http://i30.tinypic.com/2pzftcm.jpg" height="200" width="100"></a><a target="_blank" href="http://i29.tinypic.com/nvd2lk.jpg"><img src="http://i29.tinypic.com/nvd2lk.jpg" height="200" width="100"></a></marquee></marquee></center><style type=text/css> table table table td.text table table div { background-image:none;}</style>

XP Talk တစ္ခုဖန္တီးၾကည္႕ခ်င္

ကြၽန္ေတာ္ အခု တင္ျပမွာကေတာ႕ notepad နဲ႕ XP Talk တစ္ခု ဖန္တီးတဲ႕နည္းျဖစ္ပါတယ္။ Vb Script ေလးလုပ္ျပီ အဂၤလိပ္လုိ ရုိက္ျပီ OK ေပးၾကည္႕လုိက္ရင္ အသံထြက္ေလးကုိ နာေထာင္းလုိ႕ ရေအာင္ ျပဳလုပ္တဲ႕ နည္းျဖစ္ပါတယ္။ မိမိတုိ႕ ၾကိဳက္တဲ႕ စာလုံးရုိက္လုိက္ပါ။ အသံထြက္ေပးပါလိမ္႔မယ္။ အသံထြက္သိခ်င္ရင္ သုံးၾကည္႕ပါ။ လုပ္နည္းကလဲမခတ္ပါဘူး။

1. Notepad ကုိဖြင္႕လုိက္ပါ။ ( Run box ထဲမွာ notepad လုိ႕ ရုိက္ျပီ Enter ေခါက္လုိက္ပါ။ )
2. ေအာက္က စာေၾကာင္းေလးကုိ copy ကူျပီ paste လုပ္လုိက္ပါ။

Dim msg, sapi
msg=InputBox("Enter your text","Talk it")
Set sapi=CreateObject("sapi.spvoice")
sapi.Speak msg

3. ျပီရင္ xp talk.vbs လုိ႕ ေရးျပီ Desktop ေပၚမွာ save လုိက္ပါ။

4. ျပီရင္ မိမိတုိ႔ ျပလုပ္ခဲ႔တဲ႕ XP talk ေလးကုိ open လုိက္ပါ။ ေအာက္ပါအတုိင္းက်လာပါမည္။ မိမိအသံထြက္သိခ်င္တာေတြ ရုိက္ျပီ ok ေပးလုိက္ပါ။ အသံထြက္ကုိ ထြက္ေပးပါလိမ္မယ္။

babaibabaibabaibabaibabaibabai


Twitter Delicious Facebook Digg Stumbleupon Favorites More

 
Design by Free WordPress Themes | Bloggerized by Lasantha - Premium Blogger Themes | Top WordPress Themes